


 Reply With Quote
I need to grab one of these, it is a geat idea. How is the quality of the part? Decent? How long did it take to get?


Been a while since I made a showing on here. Got an internship doing Rocket Design this summer, so its been a bit hectic. Here we go.
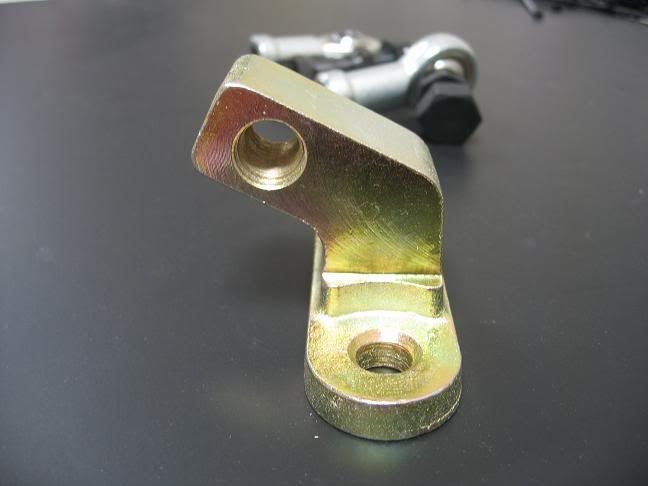
Anyway, I installed the correctional steering bracket designed by 0857 on ClubRSX. Here are pics of the piece.
The general idea behind this piece is to raise the location in which the steering arms connect to the steering rack. The raise in connection height reduces the angle at which the steering arm sits. No longer will you have an extreme upwards V shape. This helps eliminate the bump steer that is associated with dropped cars.
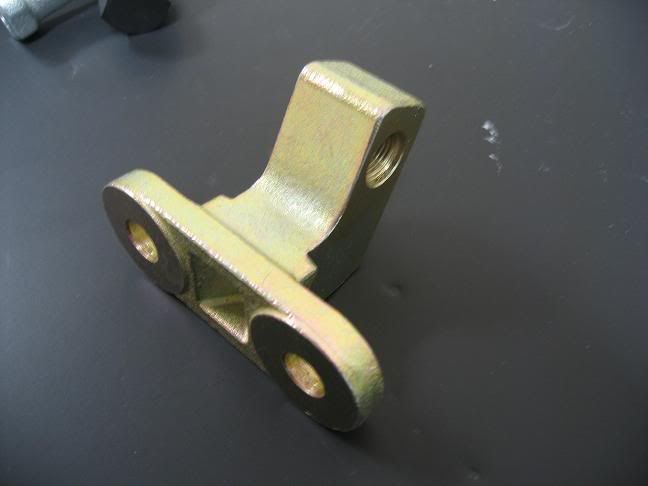
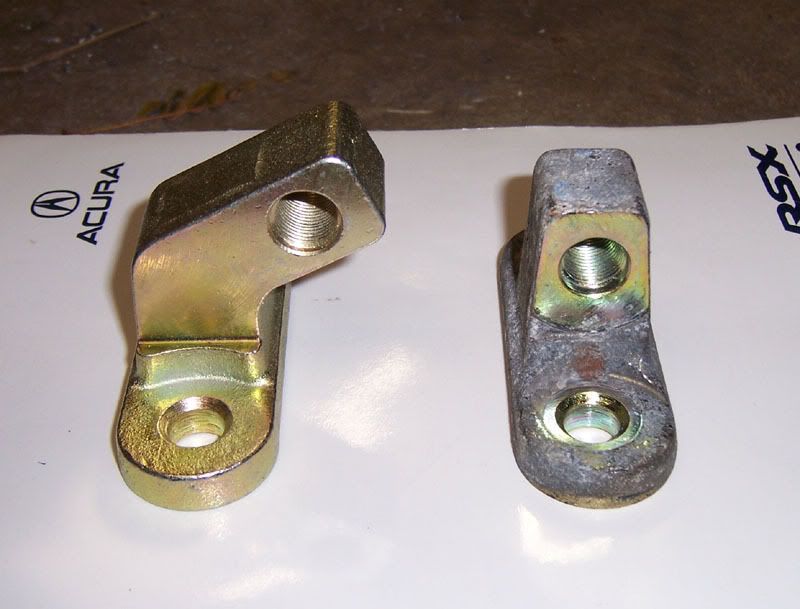
Here is a picture comparing the 0857 bracket to the stock bracket.
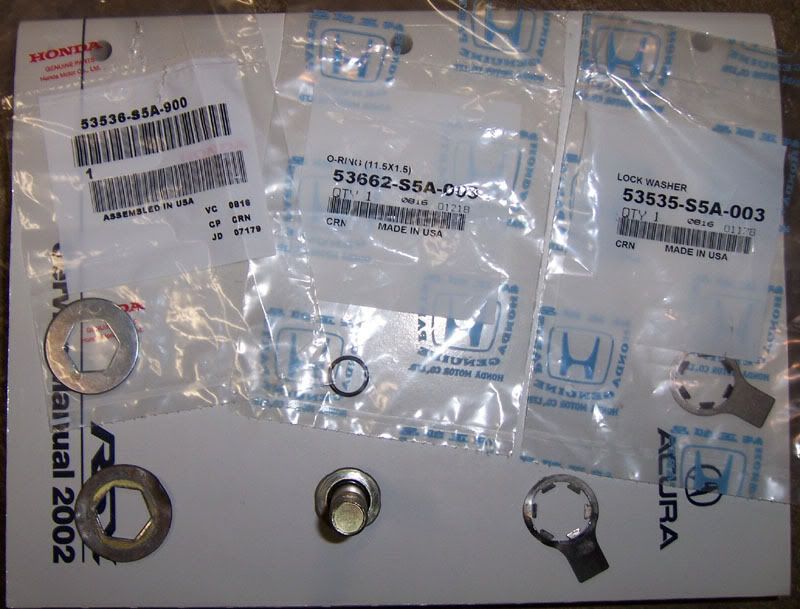
Youll need the following parts:
-2x # 53536 S5A 900 (crush washer)
-2x # 53662 S5A 003 (o-ring)
-1x # 53535 S5A 900 (lock washer)
Parts Layout
I had my motor out of the car for a different install, but this CAN be done without removing your motor. I am going to leave out some steps, but Ive linked the PDF for those of you who want a more in depth guide for each step.
General DIY.
-Youll need to remove your header and place it aside.
-Now get your tie rods loosened from teh strut assembly. Get them off and let them hang aside. (DO NOT HAMMER THE TIE ROD SHAFT)
-Next youll want to loosen up the crush washers. You can locate them by following the tie rod arms to the middle of the car. That bent up metal disc needs to be pried back to a normal-ish straight disc.
-Once you get them semi straightened, take out a large wrench and get to loosening the tie rod arms,
-After getting them off, proceed on removing the bracket. Its only two bolts.
-Replace the worn parts (crush/lock washers and o rings) with the new parts you bought as you start putting the parts back in.
The tq specs for the parts can be found on the HELMS manual. Here is a PDF link for those of you who dont have it yet.
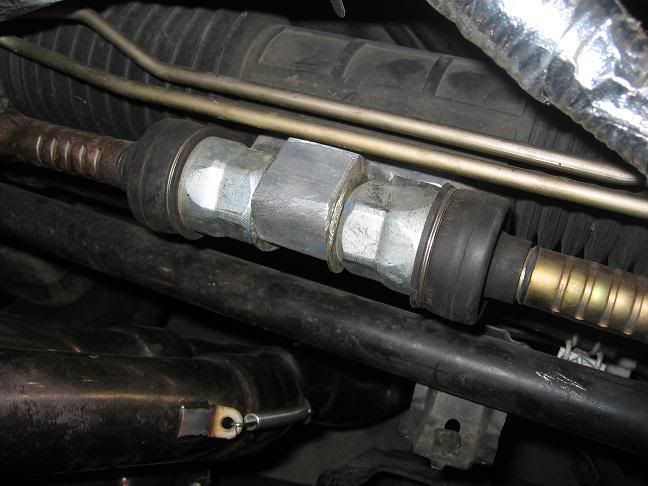
Here is the final result. Not on my car, but mine sits identically.
The car feels great. No bump steer. I honestly think this is a must for anyone with a drop who is also doing a trans or motor install. Do it while you have the extra space.
Those of you with small drops will be ok, but the ones with 1.5+ drops would really benefit from this. Doing it with the motor in will probably take a littler longer, but it is still very doable.
Ill keep you guys posted with any updates.
Last edited by PAPITUYO326; 06-02-2008 at 05:00 PM.
Your most reliable source for K24 swap help and warrantied/papered K24 longblocks. Serving the K-community since 2004.
The Evolution:
2003 Ep3 - K24A1/K20Z3 Hybrid - currently under the knife
2001 S2000 - Stock and loving it
1987 Buick T-Type WE4 - The BEAST

I need to grab one of these, it is a geat idea. How is the quality of the part? Decent? How long did it take to get?
ALL advice issued with this "Disclaimer"
Tim "the Toolman" Taylor is my HERO ! ! !
"Labor Unions are Domestic Terrorist orgainizations"
The Quality is on visually on par with OEM IMO. I put them side by side and was extremely impressed.
Shipping was quick. The guy has them ready to ship almost immediately. I paid on a Weds and had it and the inverted ends the following Tuesday.
Your most reliable source for K24 swap help and warrantied/papered K24 longblocks. Serving the K-community since 2004.
The Evolution:
2003 Ep3 - K24A1/K20Z3 Hybrid - currently under the knife
2001 S2000 - Stock and loving it
1987 Buick T-Type WE4 - The BEAST
Oh yeah, they are under $150 too. Can't beat correcting the angled rods for so cheap!
Your most reliable source for K24 swap help and warrantied/papered K24 longblocks. Serving the K-community since 2004.
The Evolution:
2003 Ep3 - K24A1/K20Z3 Hybrid - currently under the knife
2001 S2000 - Stock and loving it
1987 Buick T-Type WE4 - The BEAST

NICE!!! thanks for getting this up, GREAT INFO!!!...ill be doing this and repairing/replacing my rack when i swap!!!
my ep is white...
- We can talk numbers all you want, but the bullshit stops when the flag drops...
if u think about it.. it still puts the same pressure on the steering rack itself. just letting u know
Its not really meant to fix the rack. It corrects the bump steer that arises from the angled rod.
Your most reliable source for K24 swap help and warrantied/papered K24 longblocks. Serving the K-community since 2004.
The Evolution:
2003 Ep3 - K24A1/K20Z3 Hybrid - currently under the knife
2001 S2000 - Stock and loving it
1987 Buick T-Type WE4 - The BEAST
I've thought about this 'til my head hurt (approx. five minutes)...Originally Posted by oldskoofame

There are two separate forces being placed on the rack by the tie rods - first is the obvious right to left pressure that occurs when steering. This pressure doesn't have much to do with rack wear imo.
The second pressure is vertical... as the tie rods move up and down with the suspension, various levels of pressure are put on the rack vertically... the interior sliding surface of the rack is keyed to keep it in line. As that key and/or the groove that the key runs in wears, the dreaded creak reveals itself.
So less angle on the tie rods should produce less vertical pressure on the guts of the rack which should slow down the wear process. This is just my educated guess -don't take anything I say as gospel, but I think I'm right here.
By the way, great writeup!

I installed this bracket this past weekend. I also installed new factory upper strut mounts, seats, top hats, bearings - basically the entire upper portion of the front strut. The lower portion being Tokico blues and H&R springs. Prior, my car was so noisy and handling like such crap that I really thought I was going to have to replace the steering rack.
I simply cannot believe the difference in the way my car handles now. We did just a rough toe adjustment and we changed the rear camber slightly too. I know some of the new feel is due to the strut refresh but I think a large portion is the new position of the tie-rods too.
P.S. - I did this install with the motor in and only need to remove the lower strut bar.
EDIT: I also have no noise, creaking, popping, anything up front anymore.
I can't seem to find a place to buy # 53536 S5A 900 (crush washer). Does anyone know where I can find them? Also what would outer tierod ends do you recommend to buy?
OEM or Moog units are fine. You don't need inverted tie-rod ends once you get this upgrade (ask me how I know lol).
Call up your local dealership. They should be able to get that part for you.
Your most reliable source for K24 swap help and warrantied/papered K24 longblocks. Serving the K-community since 2004.
The Evolution:
2003 Ep3 - K24A1/K20Z3 Hybrid - currently under the knife
2001 S2000 - Stock and loving it
1987 Buick T-Type WE4 - The BEAST

I have one thing to say... YOU ARE THE MAN!! I didnt even know they had these. Thanks for all the info.
No prob. This unit has been working great for me these past 3 years.
Your most reliable source for K24 swap help and warrantied/papered K24 longblocks. Serving the K-community since 2004.
The Evolution:
2003 Ep3 - K24A1/K20Z3 Hybrid - currently under the knife
2001 S2000 - Stock and loving it
1987 Buick T-Type WE4 - The BEAST
lol didnt even pay attention to the date and that someone bumped it. Always good to bring great information back from the past that way everyone can learn.

Bump, looking to do this in the future as well. Glad to see it hold up over the 3 year period, with some aftermarket parts you just dont know.
There are currently 1 users browsing this thread. (0 members and 1 guests)
 Posting Permissions


Bookmarks