


 Reply With Quote
Nice!......


Okay, well as some may know from my other thread in the Engine section... I didnt get to take any pics of the installation of my exhaust so... ya bare with me.
First I would suggest getting some PB Blaster (imo, much better than WD-40)
Tools i used:
Socket wrench
-12mm
-14mm
-atleast one extension (i used one long one and one short one.)
breaker bar
-probably need the 1/2" to 3/8" drive converter.
i think that is all....
Depending on age of car, condition of exhaust, prior weather conditions, etc. I would start spraying all bolts down every day or so prior to install day. this will help when the time comes.
Now, before I start, I will let you know that I replaced the header, cat, and midpipe. I did not replace the axle-back. This made it a bit easier because I dropped the cat and midpipe as one piece. will explain later.
the parts i bought: (pics will be posted in the next few days.)
-Type S stock header,yr. unknown, bought from someone on this site, $40 shipped
-Type S stock Cat, '05, bought from someone on rsx forum, $100 shipped
-Type S Midpipe, '05, bought from someone on rsx forum, $90 shipped
-o2 extension, bought off rsx (above) website, little under $25 shipped
-random gaskets,bolts,nuts, acuraautomotiveparts.org $25 shipped.
For the gaskets, bolts, nuts and for the larger version of the manifold and piping pics see http://www.acuraautomotiveparts.org/...ll&systemcomp=
click on exhaust mani and exhaust piping....
Removing Exhaust:
I jacked up the front of the car...
note: just a reminder...jackstands=a must
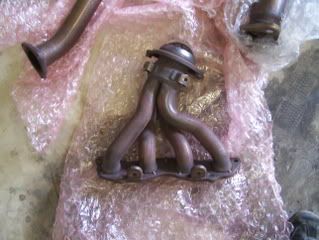
I began with the header...
Refer to this picture for reference (#).
First I removed the shield. The top two bolts (11) are very easy. Most likely they will not be rusted. The bottom two bolts (8) will be a bit harder. You can then remove the shield from a bove.
Next I removed the header itself. the top five bolts are best removed from above. this can be easily done with a longer "breaker bar" with no extension or one extension depending on which bolt you take out.
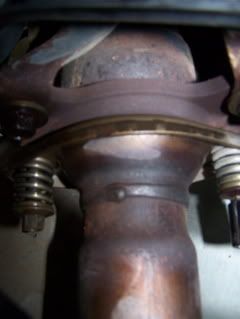
The next thing I did was remove the two spring bolts connecting the header to the cat. they may be a bit rusted but they are fairly easy to get to. After disconnecting the header from the engine and cat, the only thing holding it on is the bracket. there are two bolts on the bottom flange of the header connecting it to the bracket. Remove these. You may need a loonnngg extension for this. I found it easier.Once these bolts are out the header is free to go. I gently let it rest on the axle and such ( i was still below the car), then i grabbed it from above and removed it gently so that i dont scratch the valve cover.
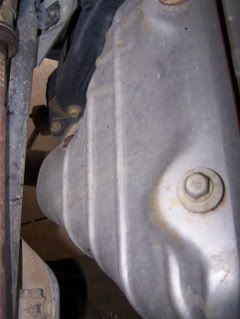
**now, if you plan on installing any type S specific header, the bracket will not be useful, in fact it will be in the way. To remove the bracket there are two bolts that connect the bracket to the engine. these bolts are directly in front of the axle going to the passenger wheel. you have to use a wrench to get them off. I did not remove them, because in the process i found that you have to remove the cover that is over the axle. this is because the space between the plastic axle cover and the engine is smaller than the length of the bolts holding the bracket on. So I left it on, good idea...probably not, but oh well. i will get back into this later.
So now, we have 5 things holding up the remainder of the exhaust. I will deal with two right now:
After removing the header, i then unplugged the two sensors from the cat. If you follow the wires from the sensors up about 6-8" (from the main sensor) you will find a collection of connectors. I unplugged the secondary first to get it out of the way. i just used some pliers to grip it (while holding the release button down). wiggle a little and it comes out pretty easily. the main o2 connector is a little different. first remove the connector from the metal tab that it is connected to. I believe there is a spot on the connector to squeeze in order to release itself from the tab. Once removed it will just want to hang there. disconnect it just like the secondary connecter. follow secondary sensor wire back, you should find one white clip holding the wire to the body, undo that with a screwdriver ( put it in the side and twist gently), it should pop open easily. keep following back and there should be a little metal bracket thing also holking it to the bottom of the car. remove it by unscrewing the one screw.
the next thing i did was go to the rear of the car and unscrew the two spring bolts between the axle-back and the midpipe. before completely unscrewing it, i put the jack underneath the rear of the midpipe.
After disconnecting the midpipe from the axle-back, I removed the rubber hanger from the car. so now the rear of the midpipe was being held up by only the jack.
I went back up to the front and removed the rubber hanger that is located at the front of the cat from the body. now there is nothing holding the exhaust up except the jack in the back and you holding the front....
remove cat and midpipe from under the car and do what you like.
I did not have an o2 sensor wrench or whatever so I removed the four tiny bolts the hold the cover on the cat. this allows you to get a wrench in there to remove the sensors. Be gentle with them, they are delicate. oh, and DO NOT SPRAY THEM WITH ANY LUBES or anything, this will ruin them.
now onto the...
Installation of the new exhaust:
Parts you might need: (part #'s from acuraautomotiveparts.org)
note:this are parts for a type s exhaust not ep exhaust!
new gaskets:
mani-gasket, part # 18115-PRB-A01, illustration # 4
header-to-cat gasket, part # 18229-S6M-A61, illustration # 14
cat-to-midpipe gasket, part # 18393-SS0-J30, illustration # 22/23
midpipe-to-axleback gasket, part # 18229-SP0-003, illustration # 16
bolts/ nuts:
( i did not use any new bolts or nuts except for the ones connecting the cat to the midpipe. the rest were in very good shape.)
Nuts (neccesary), part # 90212-SA5-003, comes with 3 nuts (there are 3 needed between cat and midpipe)
spring bolt, part # 18231-SR3-A22, if replacing all you will need 4
spring, part # 18230-SV4-000, same as above
for the header-to-engine bolts, three were actual bolts,
part # 95701-10030-08. the other two were threaded posts with locking nuts.
nuts, part # 90212-SA5-003, comes with the neccesary 2.
threaded posts, not sure about part #...
First install the old sensors into the new cat. this will require you to remove the cat-cover (4-tiny bolts).
Again i went from front to back.
To install the header back in, you may want a helping hand. I had someone start the first bolt while i held the header in place from below. Don't forget the gasket! So put in all five top bolts from above.
*Now, we are back facing the bracket problem...here is what i did: i left it's two bolts semi loose so that the bracket drooped in order for me to get the incoming header in its position. I left it like this until i got the cat bolted up.
Next I installed the cat. pretty self explanatory... i lifted it up and hooked the rubber hanger up on the hanger to help keep the 20 lb. bastard from giving me a cramp in my arm.
*note, those rubber hangers go on in a breeze if you lube up the tip of the hanger posts with a bit of wd 40 from your finger.
I proceeded to put the two spring bolts in connecting the cat to the header. Again, don't forget the gasket!
Reconnect the o2 sensors. I bought an o2 sensor extension for the main o2 sensor. IT IS A MUST! the type s cat is a few inches back from where the ep cat sits. this distance is made up by the shorter midpipe of course. the original main sensor wiring will not reach unless you stretch them out really far. the secondary will reach okay. the screw clip that holds the secondary wire will not go back in now. i ziptied the primary wires to the the secondary to get them sucked up tight to the body. ***If you wanted to do this perfectly, buy two extensions***
Next, I rested the midpipe under the car, connected the rubber hanger at the rear of the midpipe to the car hanger posts.
I then maneuvered the front of the midpipe onto the three posts sticking out of the cat. Again don't forget to remove the old crush ring gasket (if you buy a used cat) and put in the new one!
These three bolts are the ones that I ended up buying and using because the originals were pretty rusty. torque them down.
Now, go to the rear and connect the midpipe to the axle back using two spring bolts. once again, make sure there is a gasket in there... you shouldnt have to buy new spring bolts for these.
Last thing to do, figure out what the hell you want to do with that damn header bracket... here is what i did:
now that the exhaust was in its comfortable resting position, I tightened up the brackets two bolts holding it the engine. If look at the pic towards top you will notice the ep bracket has two arms. there were two holes in the ep header flange for these arms. on the type s header, there is one hole on the driver side for a bracket and this does not match up with the ep bracket.
But... if you proceed to tighten up the bracket you will find that the passenger side arm is just sitting there in la-la land not in the way of anything and the driver side arm ends up pressing up against the flange. Now i wouldn't normally leave something like this, thinking that it could damage something, but it seems to be maybe helpful. it pushes on the flange, at a safe distance away from the pipe, i might add, in a way the holds the header up and towards the engine...
I will see in time if it starts to vibrate and make noises or get really loose. i will let you know at a later time....
I believe this is the end...again sorry for the lack of pictures, I hope to soon get some pictures up of all the parts and stuff. this will be updated in the next few days with what pics i do have.
If any one finds any typos or missing parts please let me know
Last edited by jtyler05si; 08-04-2008 at 05:05 AM.

thank you sir.... i appreciate the positive feedback...Originally Posted by Forevapmp

again i am sorry about the lack of pics, i will hopefully be putting the ones i have up.
Oh, the story about the pictures:
I took a camera out with me to take pics but it ran out of memory after 4 pictures. it is my sisters so i couln't go through and deletes some old pictures.

nice write up. now i'm all messed. today i had an apointment to install my stock type-S headers, type-S specific megan racing test pipe, type-S specific T1R mid pipe and the spoon axle back and they did not have the headers gasket and didn't know wich to order. Also i don't have the O2 extension... and i don't know what gasket i need between the headers and the catHEEEEELP


My little man is all grown up
Simcivic08-> Not a problem. You need a Donut gasket to connect the header to the test pipe, a piece of cut gasket material to connect the test pipe to the midpipe, and another donut gasket to connect the T1R mid to the axleback
Header Donut Gasket, Part #14
Midpipe Donut Gasket, Part # 16
As a side note, I dont know what the end of the T1R midpipe looks like and whether the donut gasket from Acura will fit. You might need to track one down at an automotive parts store, and they generally cost around $20-40
thanks, so, is the donut gasket # 18229-S6M-A51 or 18229-S6M-A61. And what's the difference between the civic Si headers gasket and the rsx-S one

holy crap thats a longer write up than I wrote for my head swap lol.
Nicely done.
Your most reliable source for K24 swap help and warrantied/papered K24 longblocks. Serving the K-community since 2004.
The Evolution:
2003 Ep3 - K24A1/K20Z3 Hybrid - currently under the knife
2001 S2000 - Stock and loving it
1987 Buick T-Type WE4 - The BEAST

F yeah, this is great!
Good write-up, looking forward to getting this done myself in the next couple of weeks.
If I manage tosucker someone in to helping me outfind a buddy with a couple extra hours, I'll be sure to get some pics to ya. :biggrin:
haha, yes master jedi you have taught me well..
for the motor-to-header gasket, 18115-PRB-A01 is the part number. since you are using a test pipe, not a cat, you will need just that normal gasket material stuff to go between your header and test pipe, like mr. coyote said.
clubrsx sells the extensions for brand new in their market place.
http://www.clubrsx.com/cr/CLU-O2EXT-p-EXO2.html
this is the link.
the difference is that the flange is larger...since the type s midpipe is a 2.25 or 2.5 diameter versus the ep 1.75 diameter midpipe, the header opening at the bottom has to be larger. therefore you need a larger diameter gasket.
coyote correct me if i am wrong.
its not that bad to do yourself...
the only part that is nice to have someone else, is having someone hold the new header/gasket in place so you can start the bolts that go into the engine. this is very possible to do by yourself.
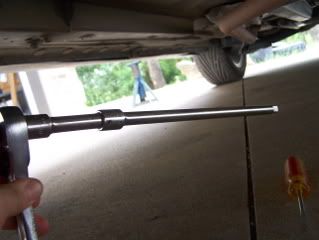
i added what pics i have....
Pics, sweet!
not much but a few

nice write-up
sweet diy
There are currently 1 users browsing this thread. (0 members and 1 guests)
 Posting Permissions


Bookmarks