

 Reply With Quote
if i were u i wouldnt want to do that job twice so itll be best to change out any thing thats a bearing


Hey all
so im going to be dropping my transmission this weekend and swapping in one i rebuilt and added an LSD. I'll obviously be throwing in a new clutch when im in there (not to mention getting the flywheel machined), because, who wouldnt.
I looked in the manual and cant find any mention of a pilot bushing or bearing. nothing regarding special tools for removal or even anything confirming its existance. what gives?
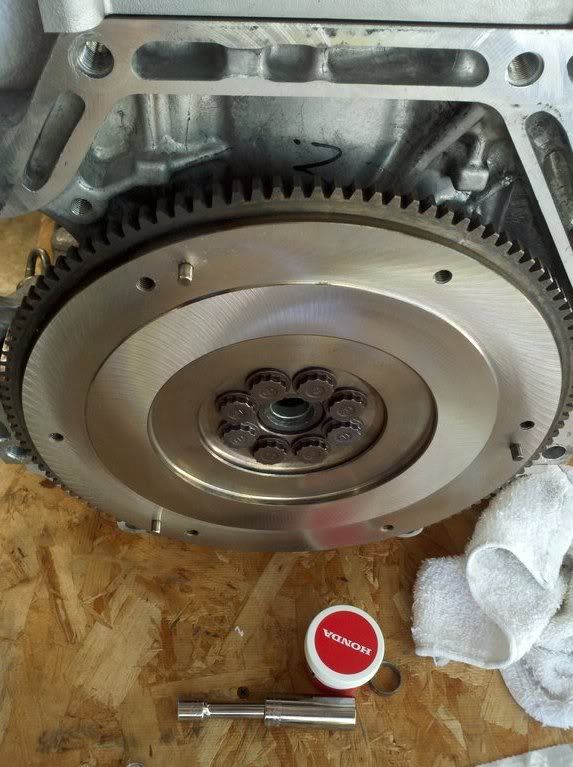
I looked on an online honda parts catalog and there is one in the picture (no. 3)
14S5S0_014-5.jpg
do people not replace these on hondas or soemthing? Do you need any special tools to do so? Do they typically come in clutch kits? Im getting a stock replacement exedy clutch but my dads not sure if it will come with a pilot bearing/bushing or not.
any insite/past experiences from the experts would be greatly appreciated.
thanks

if i were u i wouldnt want to do that job twice so itll be best to change out any thing thats a bearing

Its a bushing. Just a split ring of metal that fits in the end of the crankshaft (the very center). There is a commercial tool with a slidehammer attachment to install a new one. But if you use the end of a spare mainshaft and use it as a guide... its pretty easy to get in. Might I suggest buying two in case you fubar the first one though. LOL
You're also supposed to use Urea grease on it as well as the rest of the clutch and throwout assy (its in the red container in the pic).
Okay great info. thanks man.Originally Posted by Ba82Ep3

I have some urea grease. its not in a fancy honda bottle, but it'll do the trick. haha.
As for the slide hammer. We have a bunch at work for various mazda crap that will probably work for removal but i doubt they'll work for install. alot of them are pretty deep.
Its annoying that its not in the manual at all because if it were i could just order whatever SST they suggest having.
But i guess i'll order 2 from honda just to be safe, like you said.
Yeah i never understood why it wasnt mentioned either. There is actually a lot of little things not mentioned in the manual (IE: how do you take the VTC apart and what are the TQ values for the bolts?).
I only suggest 2 because if you bone installing the first then youre screwed till you get another. Its a soft piece of metal and it deforms easily. Youll be able to tell if its in sideways the least bit because of where its split. It will start to separate there. Its definitely the trickiest pilot bushing ive ever had to mess with.
I lube the hole with Urea grease to aid insertion (lol). I use a slide hammer to get it started. I then use a piece of wood with light taps from a hammer. Once its 90% in i finish it up with the slide hammer to seat it. I use the wood cause it dents and keeps the bushing from deforming while being tapped with a hammer. I have seen a slide hammer wallow the insertion side of the bushing... or totally ruin one with one blow.
You might wanna change your rear main seal while youre there. Its only like $10 for one. Seat it 5.5mm below the edge of the crank...

i now its already been said but just replace it. its relatively cheap. if possible, use and oem honda throwout bearing and pilot bushing
the exedy oem replacement kits come with everything you need including the grease and clutch alignment tool but i like to replace the exedy bushing and bearing with oem parts. the exedy flywheel and cltuch disc is fine. just my preference to replace certain parts with oem
Green Crew #7
Please donate and support EPHatch.com: Greenie Status, License Plate Frames, Banner & Small 'ephatch.com' Decals
Was your WTS/WTT/WTB closed? Please read the following: link 1 & link 2
got the trans out yestarday. was a bit of a chore. my dads impact gun has no balls at all so i couldnt get the passenger side axle nut off. broke two breaker bars trying to get it off.
Gave up on that, split the axle and let it come down with the knuckle attatched to the subframe. I know thats gonna be a haslte trying to reinstall it. but thats tomorrows problem. lol.
Everything else went relatively smoothly. Didnt have a puller for the pilot bushing so i used a dremel to make the split a little bigger and just popped it out. I didnt even have to go all the way through it. i was worried about cutting into the crank so i basically just weakened it with the dremel where the split was and was able to pop it out with minimal effort.
I ended up having 3 new ones as the clutch kit came with one and i got 2 from honda thinking the clutch kit wouldnt have one and wanted a second just in case.
first one went in perfectly. Thats always the way. when you are prepared for the worst, everything goes fine. lol.
thanks for all the advice guys. Now i have to cross my fingers that my trans rebuild went well. theres only so much you can tell from turning the input shaft by hand and running it through the gears. lol.
pictures rotary man
sorry, didnt get any pictures. ended up about 6hrs, in out and on with life.
Well, did a quick test drive around the block and down the expressway to make sure it went through all the gears and there were no wierd noises. didnt want to go much further as im exhausted and its halloween, so kids running around everywhere. just wanted to make sure i had a ride to work in the morning. haha.
cant wait until the clutch is broken in to go out and try the LSD.
Im glad it went well for ya... both the trans rebuild AND the pilot bushing! Its so true... if you arent 110% prepared you always have issues. lol
Ill be finishing that trans thread im working on soon. I still have tons to add to it but is there anything you can think of YOU would add to it? LMK.
- Dave
hmm...the only thing that threw me through a loop when i was doing the teardown was the "left hand threaded" things in the manual.
there were a few things that claimed to be "left hand thread" while the only one that actually was was the cap on the end of the output shaft. the manual claims the 10 (i think its 10) bolts holding the diff case to the crown gear are left hand thread, when they are definitly right hand thread.
the only thing i noticed on my test drive last night was a tiny bit of lock our when trying to get into any gear while im stopped. im attributing this to the rough cut on the flywheel and all the new stuff....im hoping it will go away very soon.
BTW, the carbon 3/4 synchros are beautiful.
pics?
sorry man, never ended up taking pics of anything. Once i get wrenching im totally focused on that and when everything is all done and back together i realize i should have taken pics. lol.
since my topic has been bumped, may as well take this opportunity to say that everything is working as it should after its all broken in and been driven on/beat on.
The clutch is great. nothing special as i went with a stock replacement exedy. Im not making any extra power, so no need for anything else
The LSD is beautiful and i know i'll never drive another car without one.
The rebuild of the tranny is holding up nicely thanks to Ba82ep3 and synchrotech for their advice and parts, respectively.
pics pics pics lol jk
There are currently 1 users browsing this thread. (0 members and 1 guests)
 Posting Permissions


Bookmarks